Table of Contents
Disclaimer:
This is how I solder. This works for me. I don't wreck things anymore, I don't lift pads off PCBs anymore, and I managed to stop having my soldering iron explode on me. That said I don't guarantee these techniques will work for you. I may be doing it wrong and you may think I'm a useless bumpkin for doing it this way, but fuggoff with your elitism. ;)
If you have any tips feel free to add them. If you have any corrections, please make them. If you think I suck, stfu.
This info was originally on this page.
General Tips
- First things first. You should be using a soldering IRON, not a soldering GUN. Guns are huge, heavy, and have larger tips. This will make it exceedingly difficult to do fine work, and you'll probably end up with a shaking arm and solder everywhere.
- You should have a safe stable place to rest your iron when it's not in use. Mind the cord. Nothing sucks like the smell of burning plastic when you drop your iron onto the carpet, and putting melt-marks on your consoles is enraging most of the time.
- You shoud be using very fine 60/40 rosin-core solder, which is cheap; a lead free solder(for environmentalists) which is slightly more expensive; or 24-carat gold, which is terribly expensive. 60/40 refers to the percentage of lead and tin in the solder, but I confess I don't remember which is which. The rosin core is for flavour, the melting rosin creates a smoke which is not unappealing but will destroy brain cells. Without rosin, the solder won't stick to shit and you will quickly get angry at the fact you can't solder anything together. If you linger too long with the hot solder, the rosin will all burn away you will have this problem.
- Keep your iron clean. You can shake excess solder onto your desk or tile floor, it will make a dime-sized splash which you can scrape off with your fingernail when it cools in about two seconds. The rosin will burn and accumulate on your iron tip. Some people wipe the rosin off on a damp cloth or sponge, I prefer to just wipe it on my jeans. NOTE! Don't do this in the summer when wearing shorts, it hurts. Also, as my father once found out, if you're wearing synthetic slacks or dress-pants it's a bad idea to run a hot iron across your leg.
- There's a process called tinning, which is basically coating something with a fine layer of solder. You should ensure your iron is always nicely tinned, as an un-tinned iron will not melt solder well, if at all. Also you should pre-tin the pieces you're working with. You'll find very quickly that trying to attach two un-tinned components will be an excercise in frustration, the solder won't stick and the cold-solder-joints will just fall apart when the heat is removed. Tinning is very easy. To tin your iron you need only put some solder on your clean iron, you'll find an un-tinned iron is kind of yellow, a nicely tinned one will be shiny and silver. When it starts to go a funny colour, clean it and if necessary tin it. Tinning isn't necessary often, typically once per long session is enough, but more often if you rub it on your jeans a lot.
- Always pre-heat your parts. Solder won't stick to anything that's not hot, so you need to heat the parts first, then apply solder. The solder should immediately flow onto both parts, then you simply remove heat and you're done. This is all there is to soldering, but for fun I've added visual guides below.
- Be stingy with your solder! Don't use too much. Typically you only want enough that you can see there's solder there, if it drips or hangs off the end of your iron you've used too much. This is especially critical when working with pads on a PCB - too much solder will glom onto adjacent pads with glee. Remember kids, surface tension is the evil enemy! It's easy to add a little more, but it can be a huge messy pain in the ass to remove the excess.
The Guide
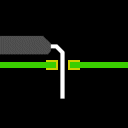
Attaching a wire to a PCB pad
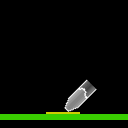


Since this is what you'll likely be doing the most, this is our first lesson. This assumes you've cleaned and tinned your iron, tinned the wire and have a bare clean pad to attach to. First apply the iron to the pad and heat it.
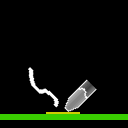
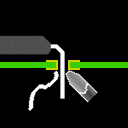
Now apply the solder to the heated pad, not to the iron. The solder should flow onto the pad easily, resulting in a liquid bubble around the iron. If so, remove the solder, then the iron. If it doesn't, check that your pad is clean, and that your iron is on. If it's off the pad won't be hot. Or if it is on, the pad might not be hot enough.
This is what you should end up with. Remember that less solder is better. If there's a pointy peak where you removed your iron, or a trail across the PCB, you've used too damned much!
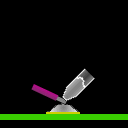
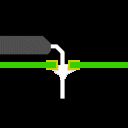
Your wire should be stripped so that about 1-2mm of metal is showing. Too much risks shorting on other components, too litle makes it hard to use. Note that when you heat a wire the plastic sheath will retract, so it will end up a little longer than you started with. You can easily cut the wire to a workable length after you tin it. To attach this wire to your pretty solder-covered pad, place it onto the soldered pad, then rest the iron on top of the wire. As the iron heats the wire, the wire will heat the pad. When it's hot enough it will sink into the solder, and then you know you've got both components hot enough, and its just a matter of making sure the solder sourrounds and flows onto the wire. Remember kids, surface tension is your friend!
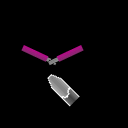
Remove the iron and inspect your work. The wire should be solidly attached to the pad now. Make sure no excess solder has glommed onto adjacent components. You should always be frugal with your solder, you don't need much and using a lot will only lead to grief, madness, and global conflict.
Attaching wire to wire
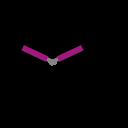

The concept here is simple, except it demands three hands. There are ways around this, but you will need at least two hands, and some way to hold the third component. Important! If you're going to use shrink-tube to protect your new connection (and you really should 'cause electrical tape sucks) be sure to put it on the wire FIRST! I can't stress enough how much it sucks to have to undo your fine work 'cause you forgot the shrink tube.
Cross the tinned bits of your wire and then heat both so that the solder already on them flows around both pieces. Move the two wires together away from the iron and after about 2 seconds they should be permanently joined.
You want to keep the two wires as close to the same angle as possible. It's easiest to join them at a ninety-degree angle, but you'll end up with sharp bits and it'll be less attractive, and take more space. On the other hand trying to attach them end-to-end is pure folly, you'll make yourself insane trying, because they'll pull apart the instant you try and move them away from the iron. The angle shown here is likely too extreme, but you're smart, you'll cope.
If you're using shrinktube, make sure you've picked tube small enough to shrink tightly against the wire. The bulges and sharp bits will hold the shrink very tightly. If you have sharp bits that are too sharp or too long you can cut them off with cutters. Slide your shrink tube onto the join, and rub the iron all over it to make it shrink.
Soldering a component to a PCB via

Ladies and gentlemen, meet my friend Via. Also known as a through-hole, a via connects one side of a PCB with the other, using a metal cylinder connected on both sides to an trace line or component. Occasionally you're going to want to install a new component on a PCB with a via, and this is how you do it. Note one new thing: Tinning your via is a bad, bad idea. Sucking solder out of these little holes is a massive pain in the ass, so you'll want to insert your components un-tinned.
Shown here is an Integrated Circuit (IC) but the same principles apply for any component, be it a resistor, diode or flux capacitor. Simply place the leg of the component through the hole. Typically the component will be snug against the PCB to minimize movement, but this may not always be the case. In the interest of saving space resistors are often shoved in vertically, for example.
Place your soldering iron against both the component and the via, so that both are heated, and then apply the solder. The solder should flow easily onto both parts. Note that it doesn't really matter which side of the PCB you do this on, as they're obviously connected, and the solder will often flow through the via. This makes it quite difficult to remove and re-use, so be careful - get the right component in the right hole the first time!
Remove the heat, and you're done! This is possibly the easiest thing to solder. Be sure to trim those long legs on the underside of the PCB tho, typically 2-3mm is the max length for anything sticking through the PCB.