This is an old revision of the document!
X68000 Six-Button Controller
There aren't many games that support the six button controller for the X68000. In fact, there's not even ten of them. If you want to play some games to their fullest, however, you'll need more than the normal two buttons. This page will show you how to do exactly that.
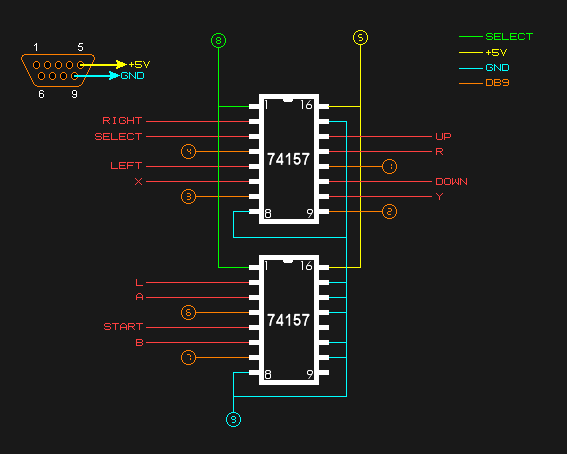
There are two mods here - one for 4-button SNK games like Fatal Fury, and one for six button games like Street Fighter 2' and Super Street Fighter 2. Both use the same chips - a pair of 74157s, the same chips found in Genesis controllers. The '157 chip is basically four A/B switches, with a single select. By utilizing two of these the X68000 can have enough inputs to utilize the entire Street Fighter control scheme (12 inputs total: six buttons, UDLR, Start + Select) with only six inputs.
CAUTION
The button labels above correspond to the Capcom Fighting Stick, which is (in essence) a SNES controller. To make a little more sense, here's a SNES/StreetFighter button map:
| SNES / StreetFighter button map | |
|---|---|
| SNES | Street Fighter |
| A | Medium kick |
| B | Weak kick |
| X | Medium punch |
| Y | Weak punch |
| L | Hard punch |
| R | Hard kick |
Modifying a 6-button Genesis/MD controller to function as an X68000 6-button pad
Step 1: Open up your 6 button Genesis/MD controller and expose the printed circuit board
Step 2: Locate the small white molex connector that connects the controller cable to the board

Step 3: Cut the black (#1), grey (#7), and white (#9) wires directly in the middle, so an equal length remains on both sides. From now on the half of the wire connected to the white connector will be referred to as the “controller side” and the half of the wire connected to the cable as the “cable side”.
Step 4: Re-connect the wires in the following way: NOTE: The copper wire inside the genesis controllers is of very poor quality and breaks easily, so is it advisable to wrap each solder joint liberally with electrical tape immediately after making the join or the wire is apt to snap.
| Cable side | Controller side |
|---|---|
| Black (#1) | Gray (#7) |
| Gray (#7) | White (#9) |
| White (#9) | Black (#1) |
Step 5: Make sure that all your solder joints are insulated, then close the controller up.
Now, your pad will function with any game as if you are using the MD-to-X68000 adapter that came with Street Fighter or Atomic Runner Chelnov, as well as an FM Towns games using similar adapters. So, the mod negates your need for the adapter.